i am currently working on a couple of graphic bible verses to hang in our house, and i downloaded all of the fonts i'm using in them for free from websites like fontspace.com and dafont.com. there are lots more. do a search to find exactly what you need.
when you find a font you like, how do you get it onto your computer and into a place where your computer recognizes it as a font? it isn't enough just to download the font from the page. hopefully, these steps will help you download and install your favorite fonts and keep you far, far away from some of those more cliche fonts.
follow these step by step and it should work for you. i do this often enough that it goes pretty quickly, and i'm not any kind of computer pro.
1. getting the font on your computer:
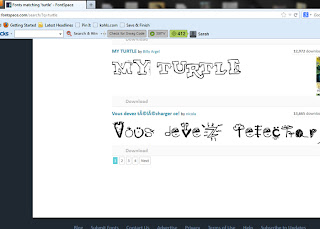
first, find a font that you like. i chose "my turtle" by billy argel. find the download button and click it. (and make sure you are clicking the actual download button for the font and not one in a strategic and tricky advertisement.)
choose the save option in the dialog box and click ok.
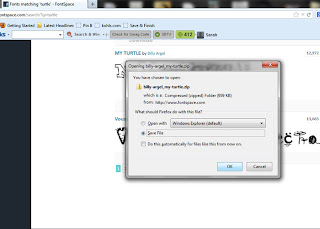
it will ask you where to save it. you choose. i usually start with mine on the desktop so they are easy to find.
minimize or close your web browser. you don't need the internet for the rest of this.
2. making the font usable:
find the folder of the font you just downloaded. it will have a zipper on it, because most font files come as zipped files. zipped files are basically compacted files for easy downloading, and they have to be "unzipped" in order to use them.
right click on your folder and click "extract all." (apple users, maybe control click. i haven't dealt with this on a mac.)
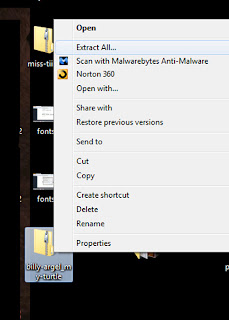
it will ask you a couple of questions about where to put the extracted files. figure out where you want them to go and click ok. i usually just go with the default options. you can always move the folder later on as long as you know where to find it.
3. opening your new downloaded font folder:
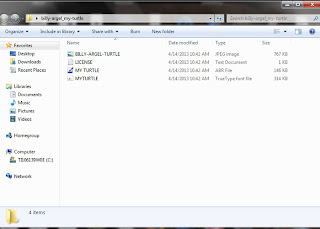
NOW there will be a matching font folder without a zipper on it. this is your unzipped font. open the folder. it will look something like this:
4. opening your computer fonts folder:
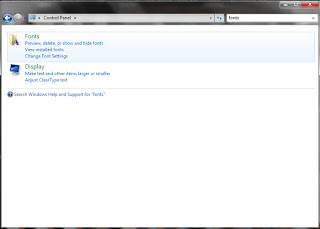
leaving the downloaded font folder where it is, open your control panel (it should be on your start menu). in the search box at the top right, type "fonts." this will appear, or something like it.
click "view installed fonts." it will look like this.
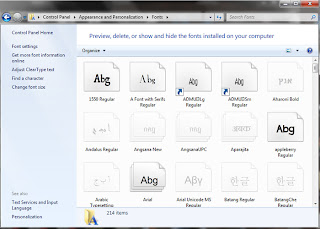
5. copying and pasting your new font into your computer fonts folder:
click your downloaded font folder, in my case, "my turtle," and find the font file. it is a true type font file, the last one listed here (placement will likely be different in your downloaded font folder - that's ok, as long as you find the font file). right click the font file. in the right click drop-down menu, choose "copy."

click your computer font folder. right click somewhere within the folder, but not directly on a font that is already installed (you may need to scroll to the bottom for this). choose "paste."
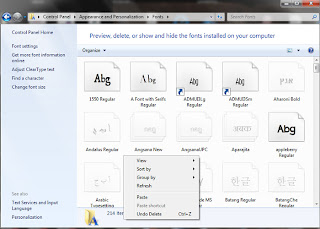
let it install. check to make sure your new font is in your computer font folder. see "my turtle?"
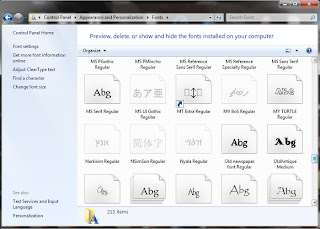
i hope this helps if you've ever wanted to download a font but weren't sure how to do it. :)

I'm a bit of a font nerd too--I loved dafont.com when I was doing nerdy homeschooled girl newsletters, haha. :)
ReplyDeleteI've missed keeping up with your blog, since I haven't even logged into blogger is fooooorever. I'm going to try doing it again, but major emphasis on TRY. :D
You can find a lot of really fun fonts at kevinandamanda.com! That's where I get a lot of mine :)
ReplyDeletei loooove finding new fonts. ohmygoodness. i've loved it ever since before i got my first laptop at age 18. haha.
ReplyDeletethanks for the tutorial! because it had been so long since i'd gotten new fonts, i'd forgotten how to do it! this was very helpful to me. :)
Thanks for writing this post, it was very helpful!
ReplyDelete